Configuring Sharing Settings for SharePoint and OneDrive Users
Overview
This guide explains how to configure sharing settings for SharePoint and OneDrive in Microsoft 365. These settings help you control how information is shared inside and outside your organization, ensuring data security while maintaining collaboration flexibility.
Step 1: Access the SharePoint Admin Center
- Sign in to the Microsoft 365 Admin Center at https://admin.microsoft.com.
- In the left navigation pane, select Admin centers, and then choose SharePoint.
💡 You’ll need SharePoint Administrator or Global Administrator permissions to access these settings.
Step 2: Open the Sharing Settings
- In the SharePoint Admin Center, go to Policies → Sharing.
- This section allows you to manage how users share content both in SharePoint and OneDrive.
- Note: OneDrive sharing settings cannot be more permissive than SharePoint’s.
Step 3: Adjust External Sharing Options
You can set different levels of external sharing for SharePoint and OneDrive.
Here are the available options:
- Anyone
Allows the most open sharing level. Files and folders can be accessed by anyone with a link, without sign-in. It also supports sharing with authenticated guests. - New and existing guests
Guests must authenticate using a Microsoft account or work/school account. You can share with both new guests and existing ones already in your directory. - Existing guests only
Restricts sharing to users who already exist as guests in your directory. Guests must authenticate before access. - Only people in your organization
Disables external sharing. Content can only be shared internally.
✅ Recommended: Use New and existing guests for most organizations. It provides a balance between collaboration and security.
Step 4: Configure Advanced Sharing Controls
Under More external sharing settings, you can fine-tune security options:
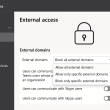
- Limit external sharing by domain
Allow or block specific domains (for example, only allow sharing withcontoso.comor blocktailspintoys.com). - Restrict external sharing to certain security groups
Limit sharing capabilities to approved users. For example, allow only members of an “ExternalSharers” group to share content externally. - Authentication requirements for guests
Require guests to sign in using the same account to which the invitation was sent. This ensures link integrity and prevents unauthorized forwarding. - Sharing permissions for guests
Control whether guests can share files they don’t own. You can also set guest access expiration and reauthentication intervals for added security.
Step 5: Configure Default Link Settings
Scroll down to adjust link and permission settings. These apply to shared files and folders:
- Default link type:
Choose between:- Anyone with the link
- People in your organization
- Specific people
- Default link permission:
Select whether new sharing links grant View or Edit rights. - Expiration for Anyone links:
Set how long anonymous sharing links remain valid (for example, 30 days).
🔒 For the highest security, select Specific people as the default link type.
Step 6: Save Your Settings
After adjusting all the settings, scroll down and select Save to apply your changes.
Important Note
These sharing settings apply organization-wide for SharePoint and determine what can be configured at the site level. Individual site settings cannot be more permissive than the organization-wide configuration.
For example, if you restrict organization-level sharing to “Existing guests only,” you cannot enable “Anyone” sharing at a specific site.
Summary
By configuring these options, you can control how SharePoint and OneDrive content is shared in your organization. These settings strike a balance between ease of collaboration and security. Use the most restrictive options that still allow your users to work efficiently with external partners.